ईमेल प्राप्त करना
प्राप्त ईमेल Email > Emails > Receiving में, inbound-messages API के ज़रिए और email.received वेबहुक में उपलब्ध होते हैं। आप जिस पते पर मेल प्राप्त करना चाहते हैं, उसके आधार पर दो सेटअप तरीकों में से एक चुनें।
- फ़ॉरवर्डिंग पता एक मेलबॉक्स है जिसे हम आपके लिए बनाते हैं, जैसे
mfzxq2lom5uxi3lb@eu1.inbound.bird.com(US क्षेत्र में@us1.inbound.bird.com)। न डोमेन चाहिए, न DNS: आप किसी मौजूदा इनबॉक्स के फ़ॉरवर्डिंग नियम को इस पते पर सेट करते हैं, और उस नियम से फ़ॉरवर्ड होने वाला हर संदेश हमें मिलता है। - अपने डोमेन पर प्राप्त करने के लिए आप अपने नियंत्रण वाले किसी सबडोमेन (जैसे
inbound.acme.com) के MX रिकॉर्ड प्रकाशित करते हैं। इसके बाद उस सबडोमेन के किसी भी पते पर भेजा गया मेल इनबाउंड संदेश के रूप में आता है।
अगर आप मेल प्राप्त करना आज़माना चाहते हैं या किसी मौजूदा सपोर्ट इनबॉक्स का मेल फ़ॉरवर्ड करना चाहते हैं, तो फ़ॉरवर्डिंग पते से शुरू करें। अगर आप चाहते हैं कि मेल सीधे आपके अपने डोमेन के पते पर आए, तो डोमेन पर प्राप्ति सेट करें।
फ़ॉरवर्डिंग पते
Email > Domains > Forwarding में Add forwarding address चुनें और Support inbox जैसा कोई नाम दर्ज करें। हम एक स्थायी, रैंडम पता बनाते हैं। आप इसका लेबल बाद में बदल सकते हैं। किसी एक फ़ॉरवर्डिंग पते को हटाने पर केवल उस पते का मेल रुकता है, बाकी पतों पर कोई असर नहीं पड़ता।
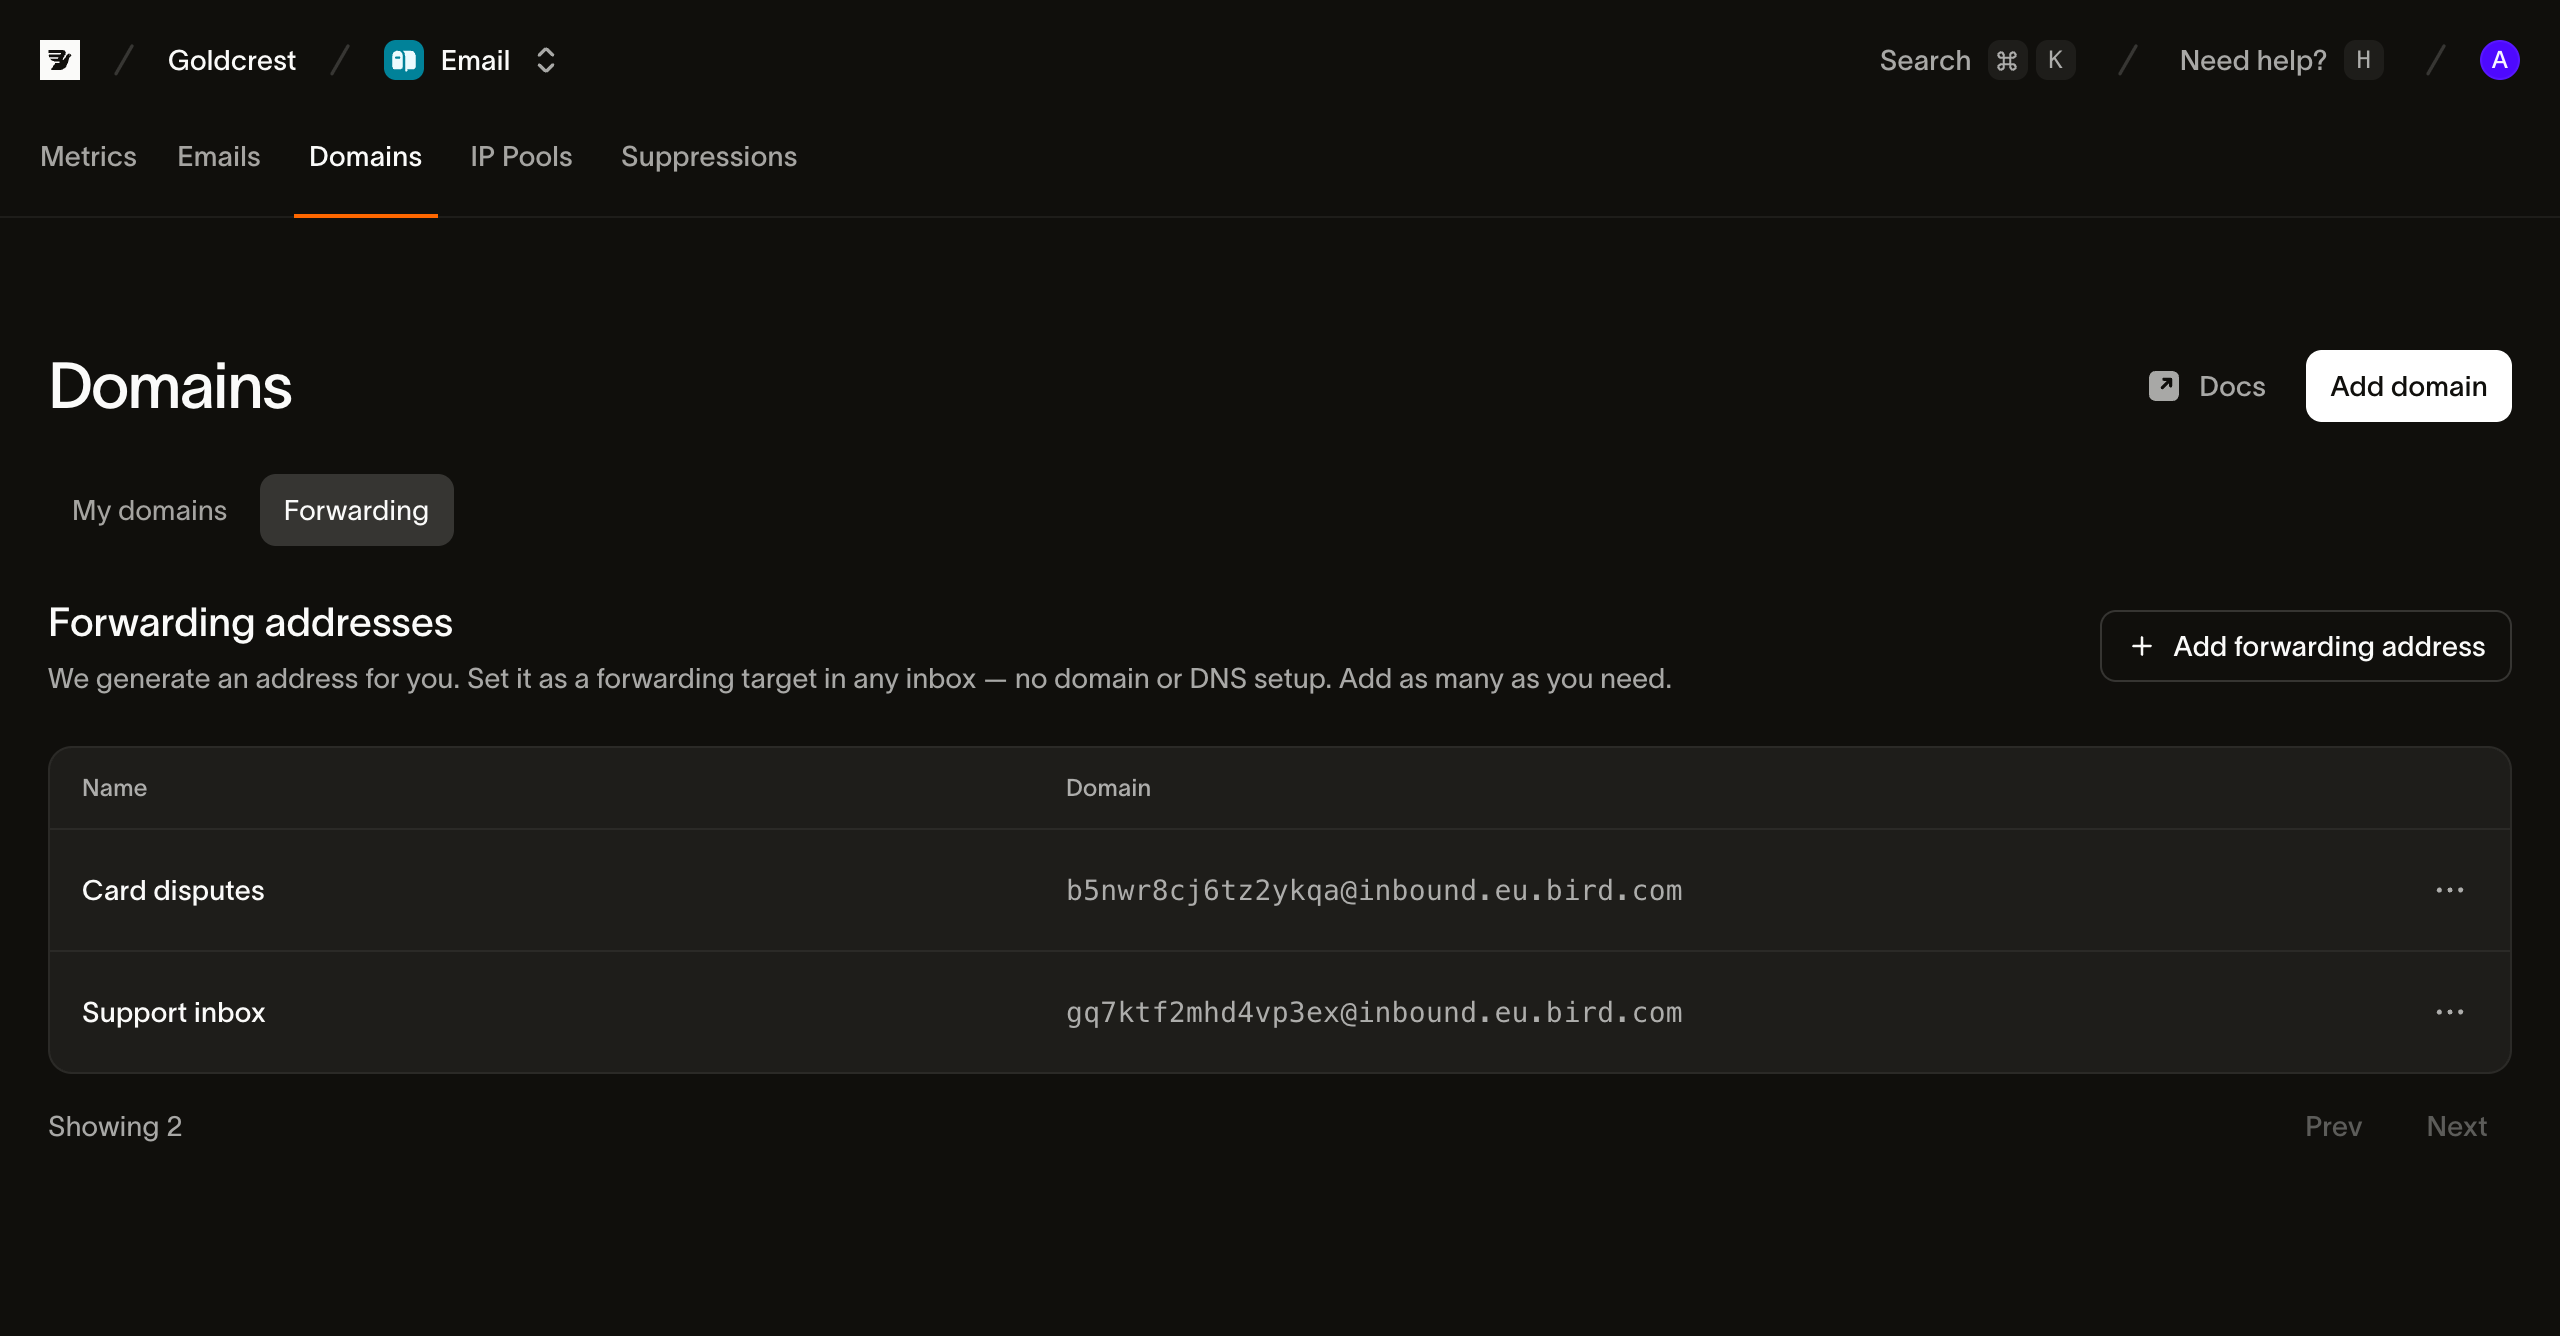
प्रोग्राम के ज़रिए POST /v1/email/inbound-addresses यही काम करता है (CLI: bird email inbound-addresses create)। प्रतिक्रिया में बनाया गया address, उसका id और आपका लेबल होता है।
इसके बाद, आपका मेल अभी जहाँ आता है, वहाँ इस पते को फ़ॉरवर्डिंग लक्ष्य के रूप में सेट करें: Gmail या Google Workspace का फ़ॉरवर्डिंग नियम, Outlook का नियम, या आपके हेल्पडेस्क की फ़ॉरवर्डिंग सेटिंग। जो भी फ़ॉरवर्ड होता है, हम उसे प्राप्त करते हैं, पार्स करते हैं और इनबाउंड संदेश के रूप में सहेजते हैं।
फ़ॉरवर्ड किए गए मेल को support@acme.com के रूप में पढ़ने और उसका जवाब देने के लिए, इसके बजाय अपने सत्यापित डोमेन पर एक एजेंट मेलबॉक्स बनाएँ। जिस डोमेन पर रिसीविंग चालू नहीं है, उस पर बने मेलबॉक्स को अपना अलग फ़ॉरवर्डिंग पता मिलता है, और उसके जवाब आपके पते से भेजे जाते हैं।
अपने डोमेन पर ईमेल प्राप्त करना
डोमेन रिसीविंग एक सेंडिंग डोमेन की क्षमता है, इसलिए डोमेन का पहले रजिस्टर और DKIM-सत्यापित होना ज़रूरी है। एक अलग सबडोमेन (inbound.acme.com) का उपयोग करें, अपने एपेक्स डोमेन का कभी नहीं। रिसीविंग डोमेन के अपने रजिस्ट्रेशन पर चालू होती है, और एपेक्स पर MX रिकॉर्ड आपके कॉर्पोरेट मेल को अपने पास खींच लेंगे।
Email > Domains खोलें, फिर अपना डोमेन चुनें। Receiving (Optional) में रिसीविंग चालू करें और सूचीबद्ध MX रिकॉर्ड प्रकाशित करें। जब तक DKIM सत्यापित नहीं होता, आप रिसीविंग चालू नहीं कर सकते। जो डोमेन पहले से किसी दूसरे संगठन के लिए मेल प्राप्त करता है, वह भी उपलब्ध नहीं है।
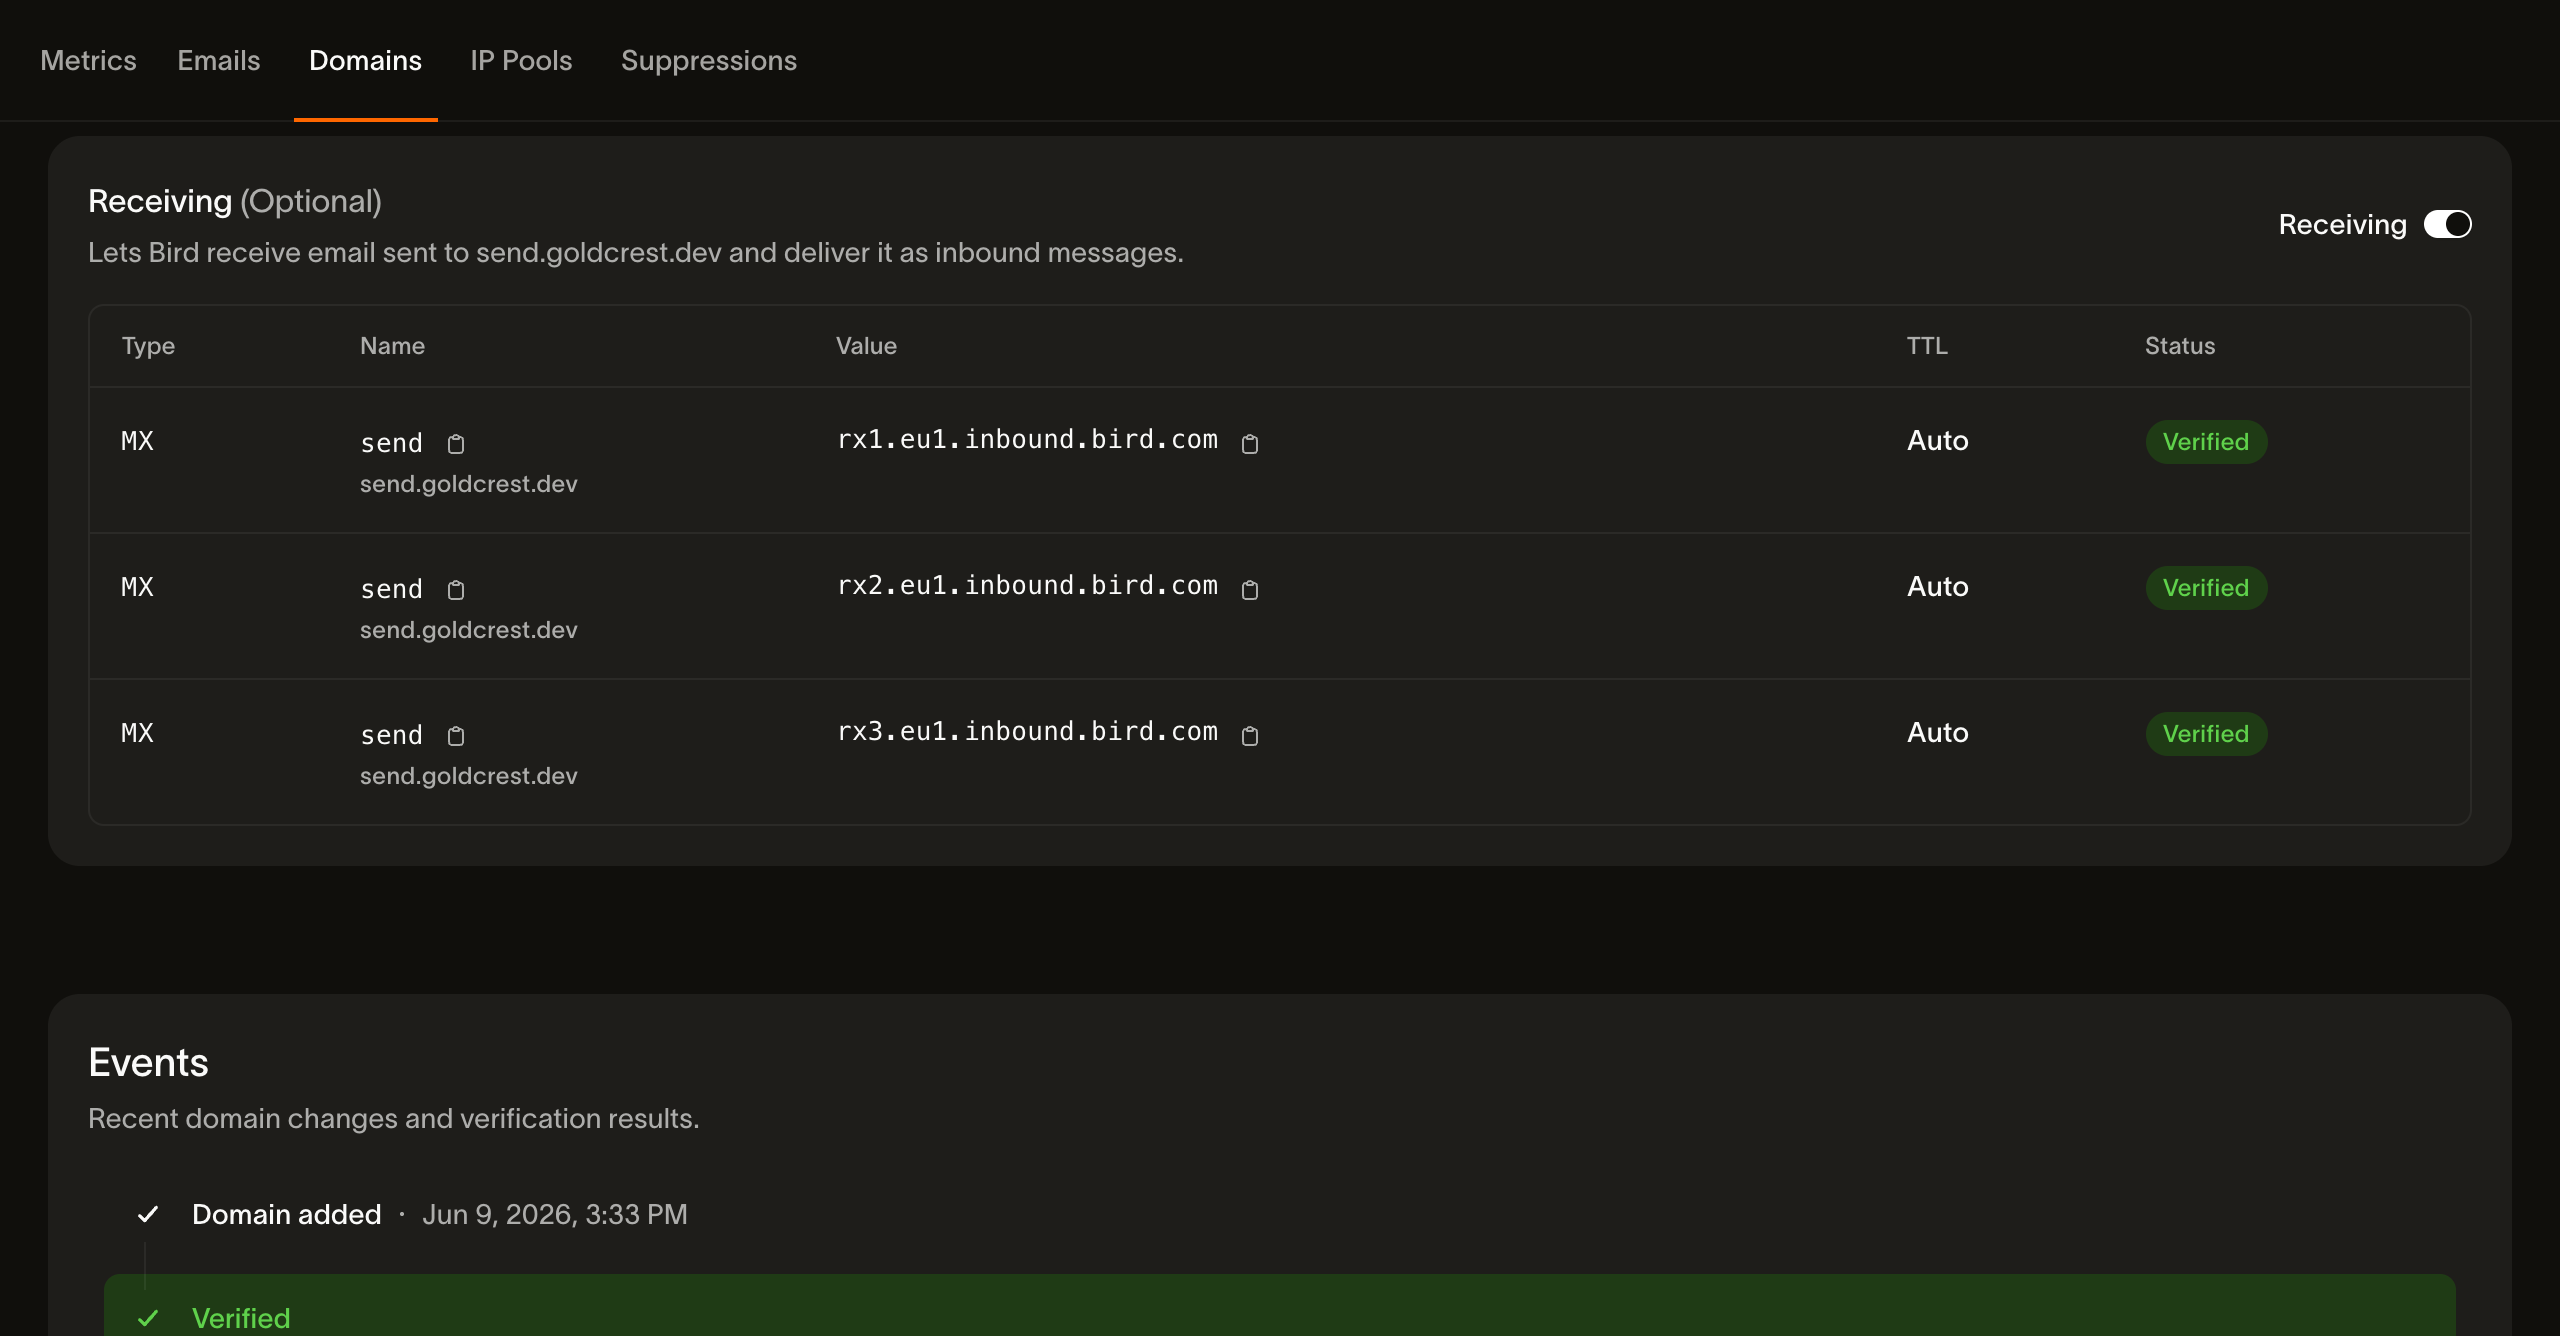
चालू होने के बाद, रिसीविंग की स्थिति सेंडिंग रिकॉर्ड जैसे ही चरणों से गुज़रती है: जब हम DNS में MX रिकॉर्ड जाँचते हैं तब pending, फिर उनके सही ढंग से रिज़ॉल्व होने पर verified। उसके बाद, डोमेन के किसी भी लोकल-पार्ट (support@, orders@, कुछ भी) पर भेजा गया मेल इनबाउंड संदेश के रूप में डिलीवर होता है। टॉगल बंद करने पर इनबाउंड मेल की डिलीवरी रुक जाती है। MX रिकॉर्ड संदर्भ के लिए डोमेन पर सूचीबद्ध रहते हैं, और उनकी स्थिति फिर से pending हो जाती है।
इनबाउंड संदेश का आकार
Bird हर क्षेत्र के हर रिसीविंग डोमेन पर, अटैचमेंट सहित, 20 MB तक के इनबाउंड संदेशों का समर्थन करता है। इससे बड़े संदेश समर्थित सीमा से बाहर हैं, भले ही भेजने वाले सर्वर को SMTP स्वीकृति प्रतिक्रिया मिले। उनकी डिलीवरी पर भरोसा न करें।
बहुत बड़े संदेश को SMTP ट्रांज़ैक्शन के दौरान 552 5.3.4 message size limit exceeded के साथ अस्वीकार किया जा सकता है। भेजने वाले सर्वर को यह अस्वीकृति मिलती है और वह अपने प्रेषक को सूचित कर सकता है। Bird आकार सीमा में फ़िट करने के लिए किसी संदेश को कभी छोटा नहीं करता।
प्राप्त ईमेल पढ़ना
Receiving टैब प्राप्त संदेशों को सबसे नए पहले क्रम में, प्रेषक, प्राप्तकर्ता, विषय और प्राप्ति समय के साथ दिखाता है। सटीक प्रेषक पते से खोजें या तारीख से फ़िल्टर करें। Rendered, Text, Details और Raw व्यू खोलने के लिए कोई पंक्ति चुनें। हेडर में संदेश आने पर दर्ज किए गए SPF, DKIM और DMARC परिणाम दिखते हैं।
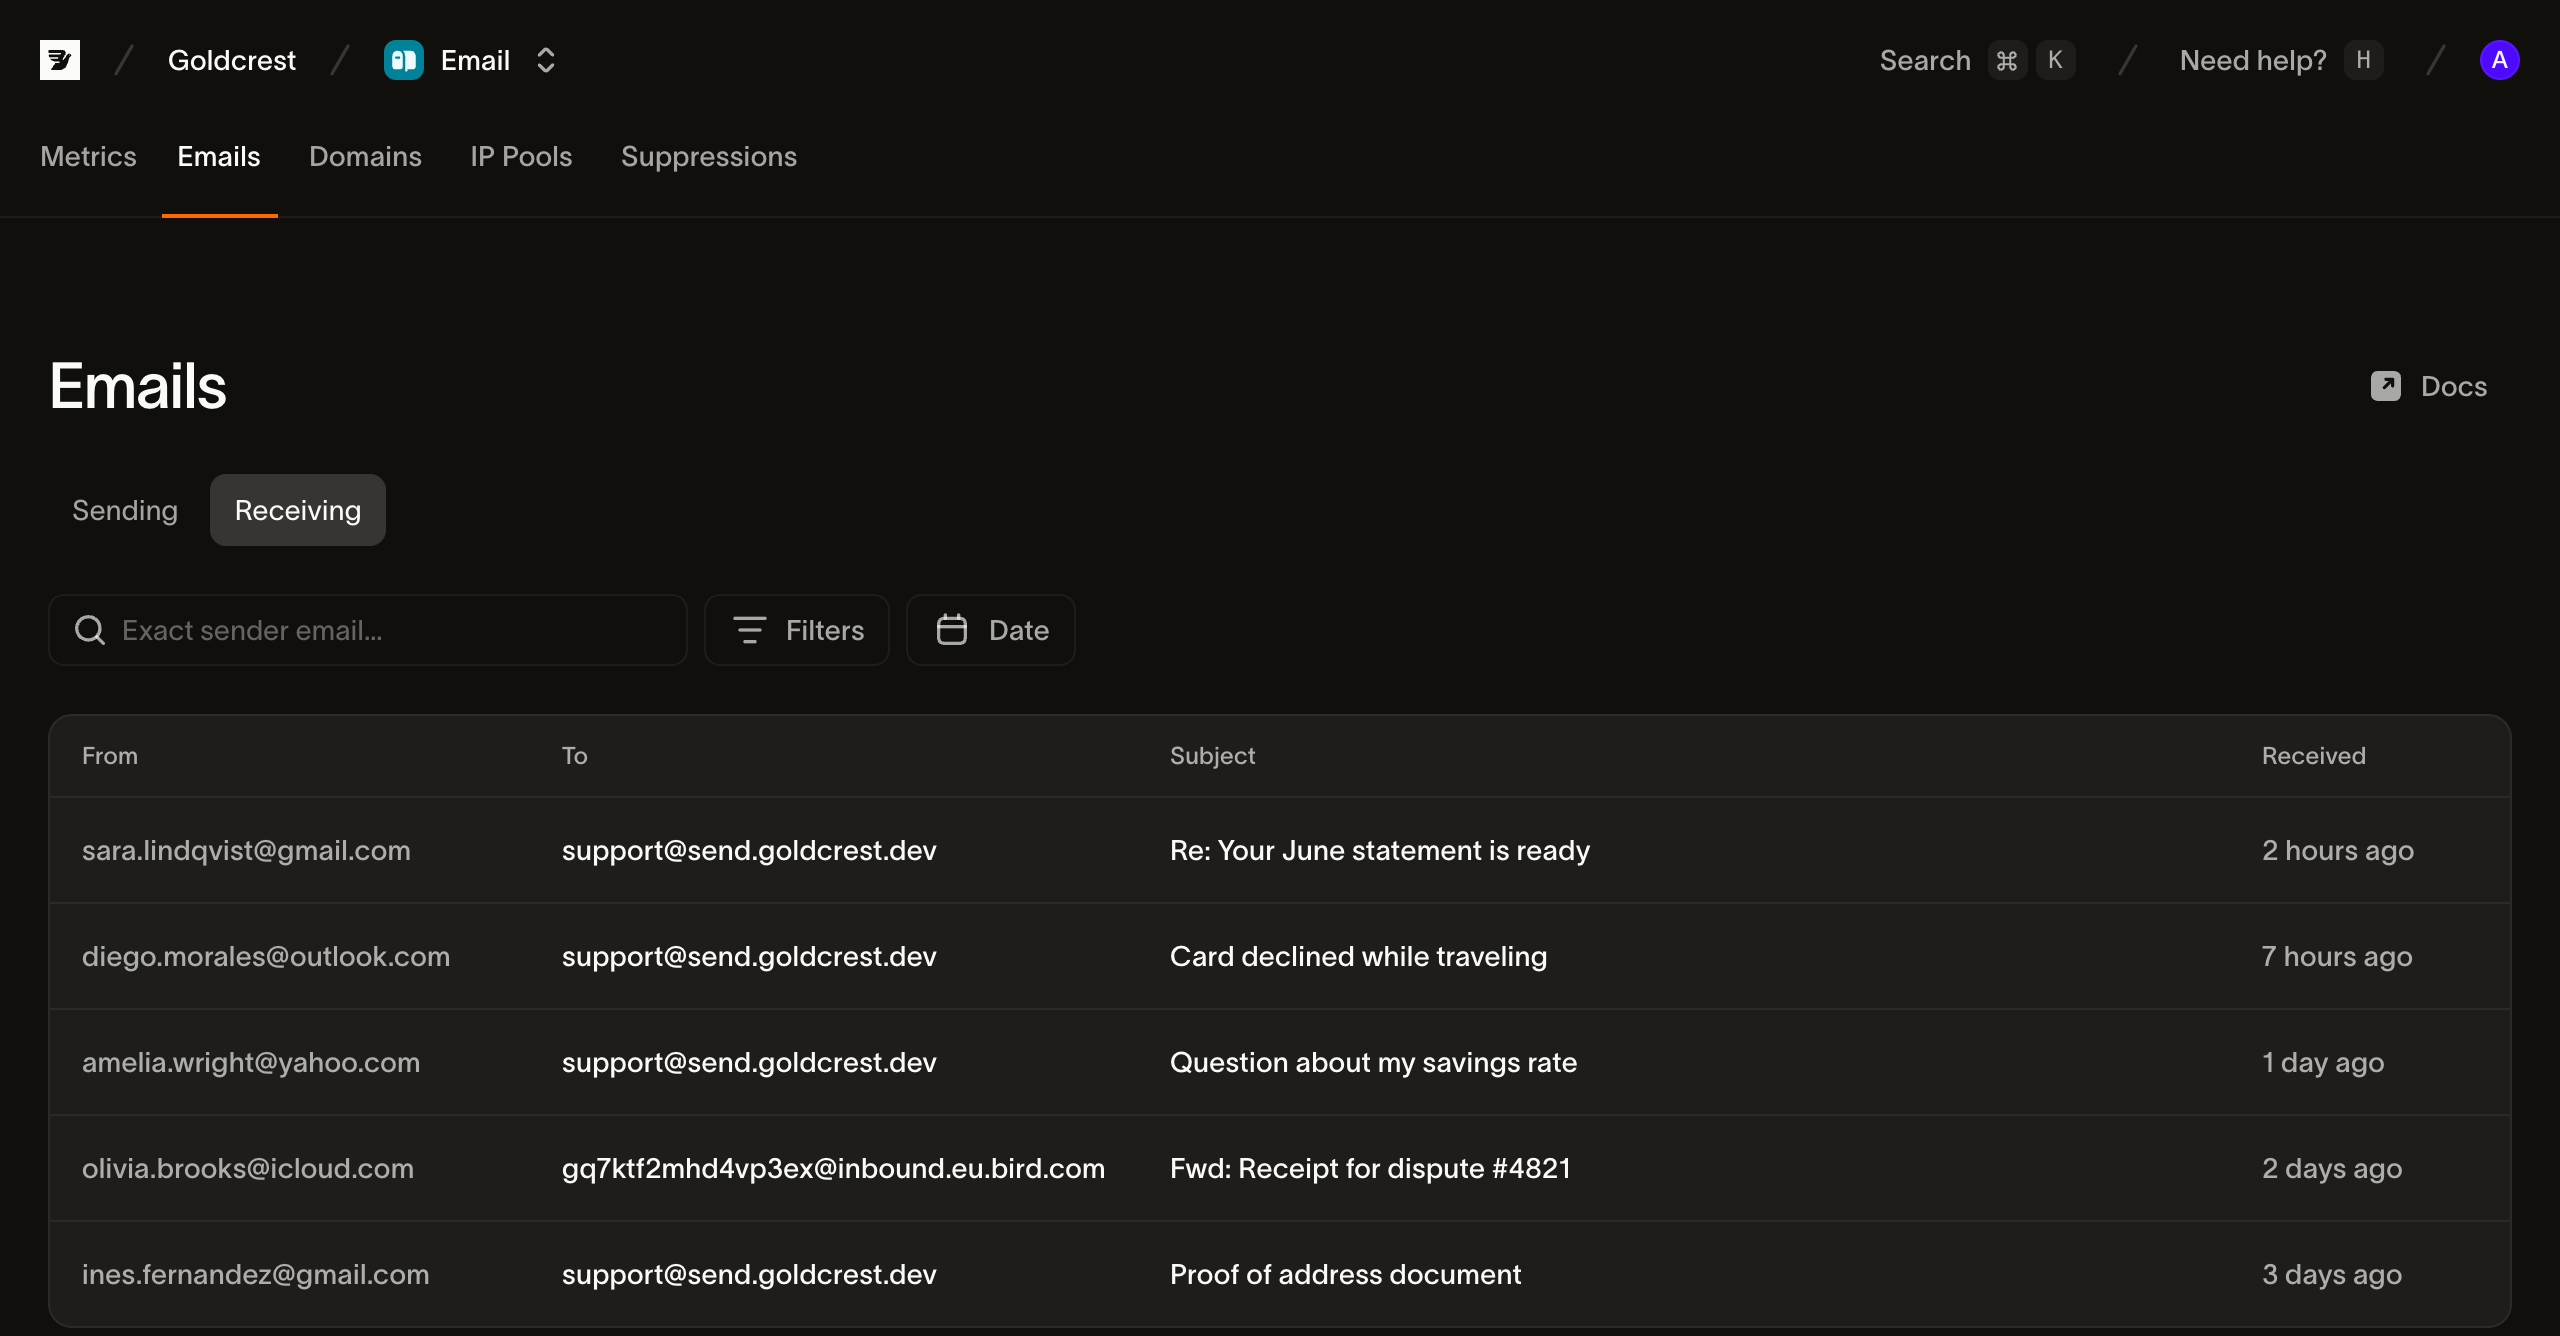
प्राप्त ईमेल 30 दिनों तक रखे जाते हैं।
यही डेटा API के ज़रिए भी उपलब्ध है (CLI: bird email inbound-messages):
GET /v1/email/inbound-messagesसंदेशों की सूची देता है, जिसे प्रेषक, इनबाउंड पते और प्राप्ति के समय के अनुसार फ़िल्टर किया जा सकता है।GET /v1/email/inbound-messages/{id}एक संदेश का पार्स किया गया मेटाडेटा लौटाता है: पते, विषय, थ्रेडिंग संदर्भ, प्रमाणीकरण परिणाम और अटैचमेंट मेटाडेटा।GET /v1/email/inbound-messages/{id}/bodyHTML और सादे टेक्स्ट वाले बॉडी लौटाता है।GET /v1/email/inbound-messages/{id}/attachmentsअटैचमेंट की सूची देता है; हर अटैचमेंट को अलग से डाउनलोड किया जा सकता है।GET /v1/email/inbound-messages/{id}/rawमूल संदेश को ठीक वैसे ही लौटाता है जैसा वह प्राप्त हुआ था, RFC 5322 (MIME) फ़ॉर्मेट में।
प्राप्त मेल पर प्रतिक्रिया देना: email.received वेबहुक
मेल आते ही उसे प्रोसेस करने के लिए (सपोर्ट अनुरोधों को रूट करना, जवाबों को इनजेस्ट करना, किसी एजेंट को ट्रिगर करना), किसी वेबहुक एंडपॉइंट को email.received इवेंट के लिए सब्सक्राइब करें। हम हर संदेश को प्राप्त और पार्स करने के बाद यह इवेंट भेजते हैं। पेलोड में inbound_message_id, संदेश के From हेडर से लिया गया प्रेषक, प्राप्तकर्ता, विषय और in_reply_to संदर्भ शामिल होते हैं। इसमें एक समग्र authentication निर्णय (pass, fail या unknown) और अलग-अलग SPF, DKIM और DMARC परिणाम भी होते हैं; प्रमाणीकरण परिणामों का उपयोग बताता है कि इनमें से कौन-से अभी भरे जाते हैं। इस जानकारी से आप बिना किसी अतिरिक्त कॉल के रूटिंग और छँटाई कर सकते हैं। जब आपको बॉडी या अटैचमेंट चाहिए, तो इवेंट से मिले inbound_message_id का उपयोग करके इनबाउंड-मैसेज API से उन्हें प्राप्त करें। इवेंट भेजने से पहले संदेश स्टोर हो जाता है, इसलिए इवेंट आप तक पहुँचते ही वह id काम करती है: अपने हैंडलर से सीधे /raw या /body प्राप्त करें, बिना इंतज़ार और बिना पोलिंग के।
प्रमाणीकरण परिणामों का उपयोग
जब कोई संदेश Bird तक पहुँचता है, तब SPF और DKIM की जाँच की जाती है। प्रेषक द्वारा जोड़े गए हेडर, जैसे उनका अपना Authentication-Results, इन परिणामों को नहीं बदलते।
spf_pass और dkim_pass फ़ील्ड में से हर एक का मान true, false या null होता है। null का अर्थ है कि कोई परिणाम दर्ज नहीं हुआ, उस स्थिति में भी जब कोई जाँच पूरी नहीं हो सकी। एक पास होने वाला DKIM सिग्नेचर dkim_pass को true कर देता है, भले ही संदेश पर कोई दूसरा सिग्नेचर फ़ेल हो। ये फ़ील्ड विस्तृत परिणाम टोकन, साइनिंग डोमेन या सेलेक्टर नहीं दिखाते।
DMARC परिणाम अभी उपलब्ध नहीं हैं। जब तक वे उपलब्ध नहीं होते, dmarc_pass और spam_score हमेशा null रहते हैं, और authentication, जो dmarc_pass के अनुसार तय होता है, हमेशा unknown रहता है। अभी dmarc_pass === true या authentication === "pass" के आधार पर रूटिंग न करें: कोई भी संदेश इनमें से किसी भी शर्त को पूरा नहीं करता।
अभी स्वचालित रूटिंग को नियंत्रित करने के लिए dkim_pass === true या spf_pass === true की शर्त रखें, और false, null तथा अनुपस्थित मानों को असत्यापित मानें। SPF और DKIM के पास होने से यह पुष्टि नहीं होती कि साइन करने वाला या भेजने वाला डोमेन दिखाई देने वाले From हेडर के डोमेन से मेल खाता है। इनका उपयोग बिना प्रमाणीकरण वाले मेल को छाँटने के लिए करें, भेजने वाले की पहचान के प्रमाण के रूप में नहीं।
DMARC संदेश के From हेडर में मौजूद डोमेन के साथ संरेखण की जाँच करता है। email.received में from फ़ील्ड में वही हेडर पता होता है। हेडर पढ़ा न जा सके तो पहले रिले द्वारा पार्स किया गया प्रेषक और फिर एनवेलप प्रेषक विकल्प के रूप में इस्तेमाल होते हैं। email_mailbox.message_received में from में एनवेलप प्रेषक होता है, जो कोई अलग बाउंस पता हो सकता है। दिखाई देने वाले प्रेषक के आधार पर मेलबॉक्स रूटिंग के लिए, इवेंट के message_id से प्राप्त संदेश का मेटाडेटा प्राप्त करें। DMARC पास होने से एक डोमेन प्रमाणित होता है; इससे यह सिद्ध नहीं होता कि संदेश किसी विशेष व्यक्ति ने भेजा है।
अगले कदम
- भेजने वाले डोमेन: जिस डोमेन पर आप मेल प्राप्त करना चाहते हैं, उसे रजिस्टर और सत्यापित करें।
- वेबहुक:
email.receivedके लिए एंडपॉइंट, सिग्नेचर और फिर से प्रयास। - Superagent: किसी एजेंट के कार्रवाई करने से पहले प्राप्त मेल को स्कोर करें।
- ईमेल लॉग: Emails पेज का भेजने वाला हिस्सा।
संबंधित संसाधन
इस विषय के लिए दस्तावेज़, गाइड और उदाहरणों के साथ आगे बढ़ें।