Vérifiez votre premier client
Bird Verify confirme qu'une personne contrôle une adresse e-mail ou un numéro de téléphone. Vous demandez à Bird d'envoyer un code de vérification à usage unique. La personne le saisit dans votre application, et vous demandez à Bird s'il correspond. Bird génère et envoie le code, et applique l'expiration et les limites de tentatives. Votre application ne reçoit ni ne stocke jamais le code généré.
Ce guide de démarrage vérifie votre propre adresse e-mail, ce qui ne nécessite aucune configuration. Bird envoie les codes par e-mail via son expéditeur partagé Bird Verify, vous n'avez donc besoin ni de domaine ni de solde. Après avoir approvisionné SMS, vérifier un numéro de téléphone utilise les deux mêmes appels.
1. Créer une clé API
Dans le tableau de bord, accédez à Developers > Clés API et créez une clé. Les clés sont limitées à une région et ressemblent à bk_us1_... ou bk_eu1_... ; la région dans le préfixe vous indique quel hôte API appeler : https://us1.platform.bird.com ou https://eu1.platform.bird.com.
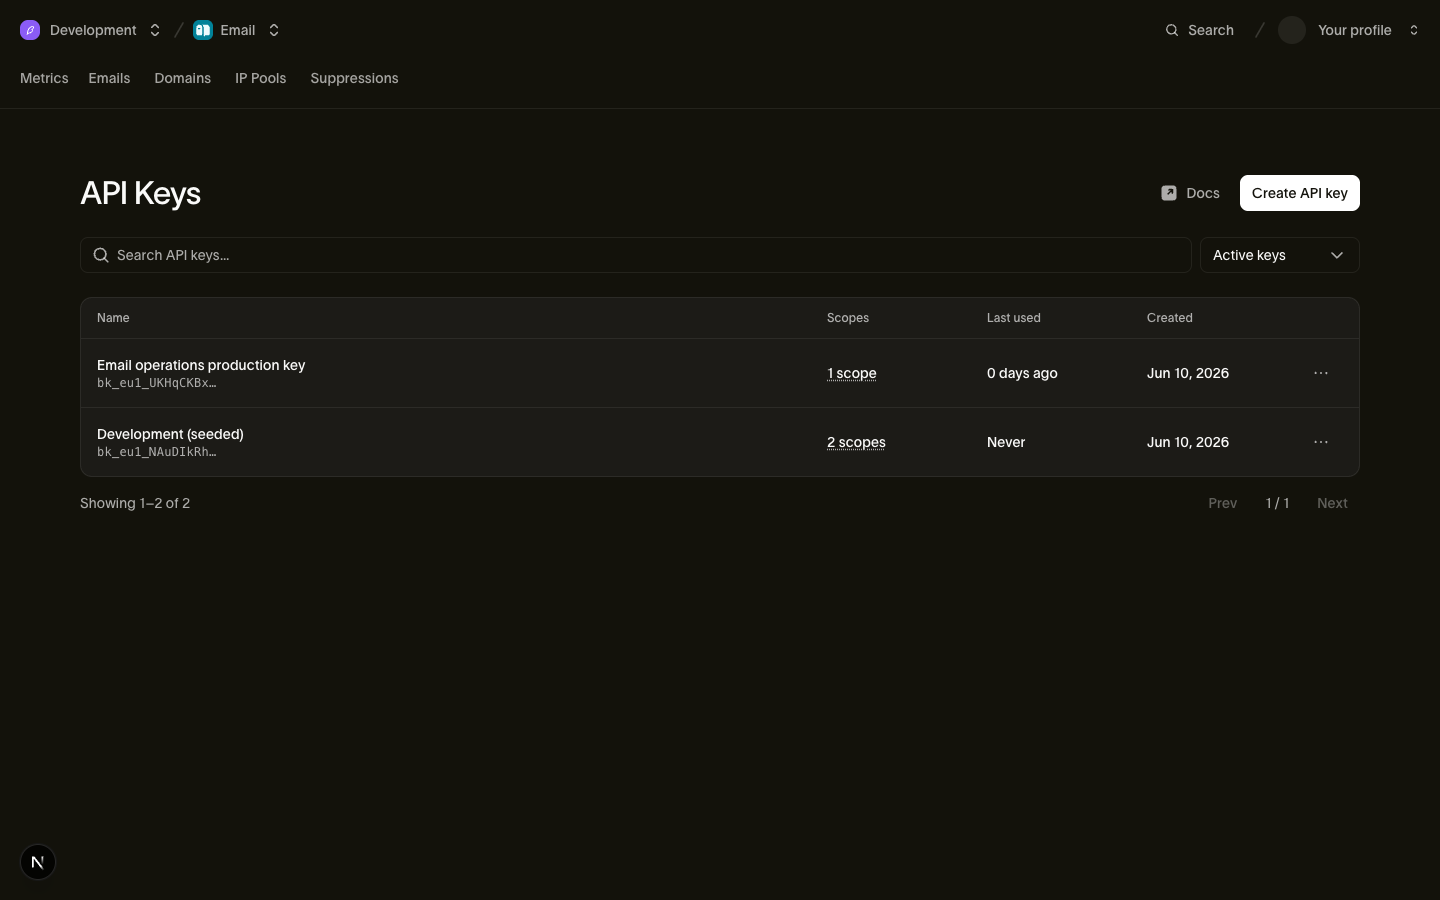
La clé complète est affichée une seule fois, au moment de la création. Copiez-la dans un endroit sûr, puis exportez-la pour les exemples d'envoi :
export BIRD_API_KEY="bk_us1_..."2. Envoyer un code
Créez une vérification pour l'adresse que vous souhaitez confirmer. Le seul champ requis est to. Utilisez votre propre adresse e-mail pour pouvoir lire le code. Installez le Bird SDK pour votre langage en suivant son guide de démarrage SDK.
Dans les onglets SDK, remplacez la clé API et user@example.com d'exemple avant d'exécuter le code. L'onglet CLI utilise votre identifiant, et l'onglet cURL utilise BIRD_API_KEY.
import { BirdClient } from "@messagebird/sdk";

const bird = new BirdClient({ apiKey: "bk_XXXXXXXXXXXXXXXXXXXXXXXX" });

const verification = await bird.verify.verifications.create({
  to: { email: "user@example.com" },
});

console.log(verification.id, verification.status);
from bird import APIError, Bird
with Bird(api_key="bk_XXXXXXXXXXXXXXXXXXXXXXXX") as client:
try:
verification = client.verify.verifications.create(
to={"email": "user@example.com"},
)
print(verification.id, verification.status)
except APIError as err:
print("could not start the verification:", err)package main
import (
"context"
"fmt"
"log"
bird "github.com/messagebird/bird-sdk-go"
"github.com/messagebird/bird-sdk-go/option"
)
func main() {
client, err := bird.NewClient(option.WithAPIKey("bk_XXXXXXXXXXXXXXXXXXXXXXXX"))
if err != nil {
log.Fatal(err)
}
verification, err := client.Verify.Verifications.Create(context.Background(), bird.VerifyVerificationsCreateParams{
To: bird.VerificationTo{Email: bird.Email("user@example.com")},
})
if err != nil {
log.Fatal(err)
}
fmt.Println(verification.Id, *verification.Status)
}<?php
declare(strict_types=1);
require __DIR__ . '/../vendor/autoload.php';
use MessageBird\Bird;
use MessageBird\Wire\Model\VerificationCreateRequest;
use MessageBird\Wire\Model\VerificationTo;
$bird = new Bird('bk_XXXXXXXXXXXXXXXXXXXXXXXX');
$verification = $bird->verify->verifications->create(
(new VerificationCreateRequest())
->setTo((new VerificationTo())->setEmail('user@example.com')),
);
echo $verification->getId(), ' ', $verification->getStatus(), "\n";bird verify verifications create --email user@example.comcurl -X POST https://us1.platform.bird.com/v1/verify/verifications \
-H "Authorization: Bearer $BIRD_API_KEY" \
-H "Content-Type: application/json" \
-d '{
"to": { "email": "user@example.com" }
}'Si votre clé commence par bk_eu1_, appelez https://eu1.platform.bird.com à la place.
Bird accepte la requête et commence à envoyer le code :
{
  "id": "vrf_01ky7q1fdze3695yvyz7z9nm3a",
  "status": "pending",
  "reason": null,
  "to": { "email": "user@example.com" },
  "channels": [{ "channel": "email" }],
  "last_channel": "email",
  "expires_at": "2026-07-23T14:55:58Z",
  "verified_at": null,
  "created_at": "2026-07-23T14:45:58Z",
  "updated_at": "2026-07-23T14:45:58Z"
}
Aucun identifiant de vérification à stocker : la vérification à l'étape 3 est identifiée par le même destinataire. L'e-mail arrive de Bird Verify <otp@verify.bird.com> avec le sujet "Your verification code" et un code à six chiffres ; le message lui-même indique quand il expire. La longueur du code, sa durée de vie, le nombre maximal de tentatives et le délai de renvoi sont des paramètres de l'espace de travail, et paramètres de vérification liste les valeurs par défaut et les plages.
3. Vérifier le code
Prenez le code dans votre boîte de réception et soumettez-le, identifié par le même destinataire :
import { BirdClient } from "@messagebird/sdk";

const bird = new BirdClient({ apiKey: "bk_XXXXXXXXXXXXXXXXXXXXXXXX" });

const result = await bird.verify.verifications.check({
  to: { email: "user@example.com" },
  code: "123456",
});

console.log(result.success);
from bird import APIError, Bird
with Bird(api_key="bk_XXXXXXXXXXXXXXXXXXXXXXXX") as client:
try:
result = client.verify.verifications.check(
to={"email": "user@example.com"},
code="123456",
)
print(result.success)
except APIError as err:
print("could not check the passcode:", err)package main
import (
"context"
"fmt"
"log"
bird "github.com/messagebird/bird-sdk-go"
"github.com/messagebird/bird-sdk-go/option"
)
func main() {
client, err := bird.NewClient(option.WithAPIKey("bk_XXXXXXXXXXXXXXXXXXXXXXXX"))
if err != nil {
log.Fatal(err)
}
result, err := client.Verify.Verifications.Check(context.Background(), bird.VerifyVerificationsCheckParams{
To: bird.VerificationTo{Email: bird.Email("user@example.com")},
Code: "123456",
})
if err != nil {
log.Fatal(err)
}
fmt.Println(*result.Success)
}<?php
declare(strict_types=1);
require __DIR__ . '/../vendor/autoload.php';
use MessageBird\Bird;
use MessageBird\Wire\Model\VerificationCheckRequest;
use MessageBird\Wire\Model\VerificationTo;
$bird = new Bird('bk_XXXXXXXXXXXXXXXXXXXXXXXX');
$result = $bird->verify->verifications->check(
(new VerificationCheckRequest())
->setTo((new VerificationTo())->setEmail('user@example.com'))
->setCode('123456'),
);
echo $result->getSuccess() ? 'verified' : 'not verified', "\n";bird verify verifications check 123456 --email user@example.comcurl -X POST https://us1.platform.bird.com/v1/verify/verifications/check \
-H "Authorization: Bearer $BIRD_API_KEY" \
-H "Content-Type: application/json" \
-d '{
"to": { "email": "user@example.com" },
"code": "123456"
}'Un code correct revient success: true, et la vérification intégrée passe à verified :
{
  "success": true,
  "reason": null,
  "attempts_remaining": null,
  "verification": {
    "id": "vrf_01ky7q1fdze3695yvyz7z9nm3a",
    "status": "verified",
    "reason": null,
    "to": { "email": "user@example.com" },
    "channels": [{ "channel": "email" }],
    "last_channel": "email",
    "expires_at": "2026-07-23T14:55:58Z",
    "verified_at": "2026-07-23T14:46:47Z",
    "created_at": "2026-07-23T14:45:58Z",
    "updated_at": "2026-07-23T14:46:47Z"
  }
}
Avant d'ajouter ce flux à une inscription, tenez compte de ces résultats :
- Une vérification échouée renvoie HTTP
200. La réponse contientsuccess: false, unreason(incorrect_code,expiredouattempts_exhausted), et un compteurattempts_remainingtant qu'il reste des tentatives. Branchez votre application sur ce résultat. La vérification échoue définitivement une fois ses tentatives de vérification épuisées. - Une vérification ne se résout qu'une fois. Après avoir atteint
verified(ou échoué ou expiré), la vérifier à nouveau renvoie un404. Considérez la première réponse définitive comme la réponse. Si l'utilisateur a besoin d'un nouveau code, appelez à nouveau le endpoint de création avec le même destinataire : la vérification en cours est réutilisée, et un nouveau code est envoyé une fois le délai de renvoi écoulé.
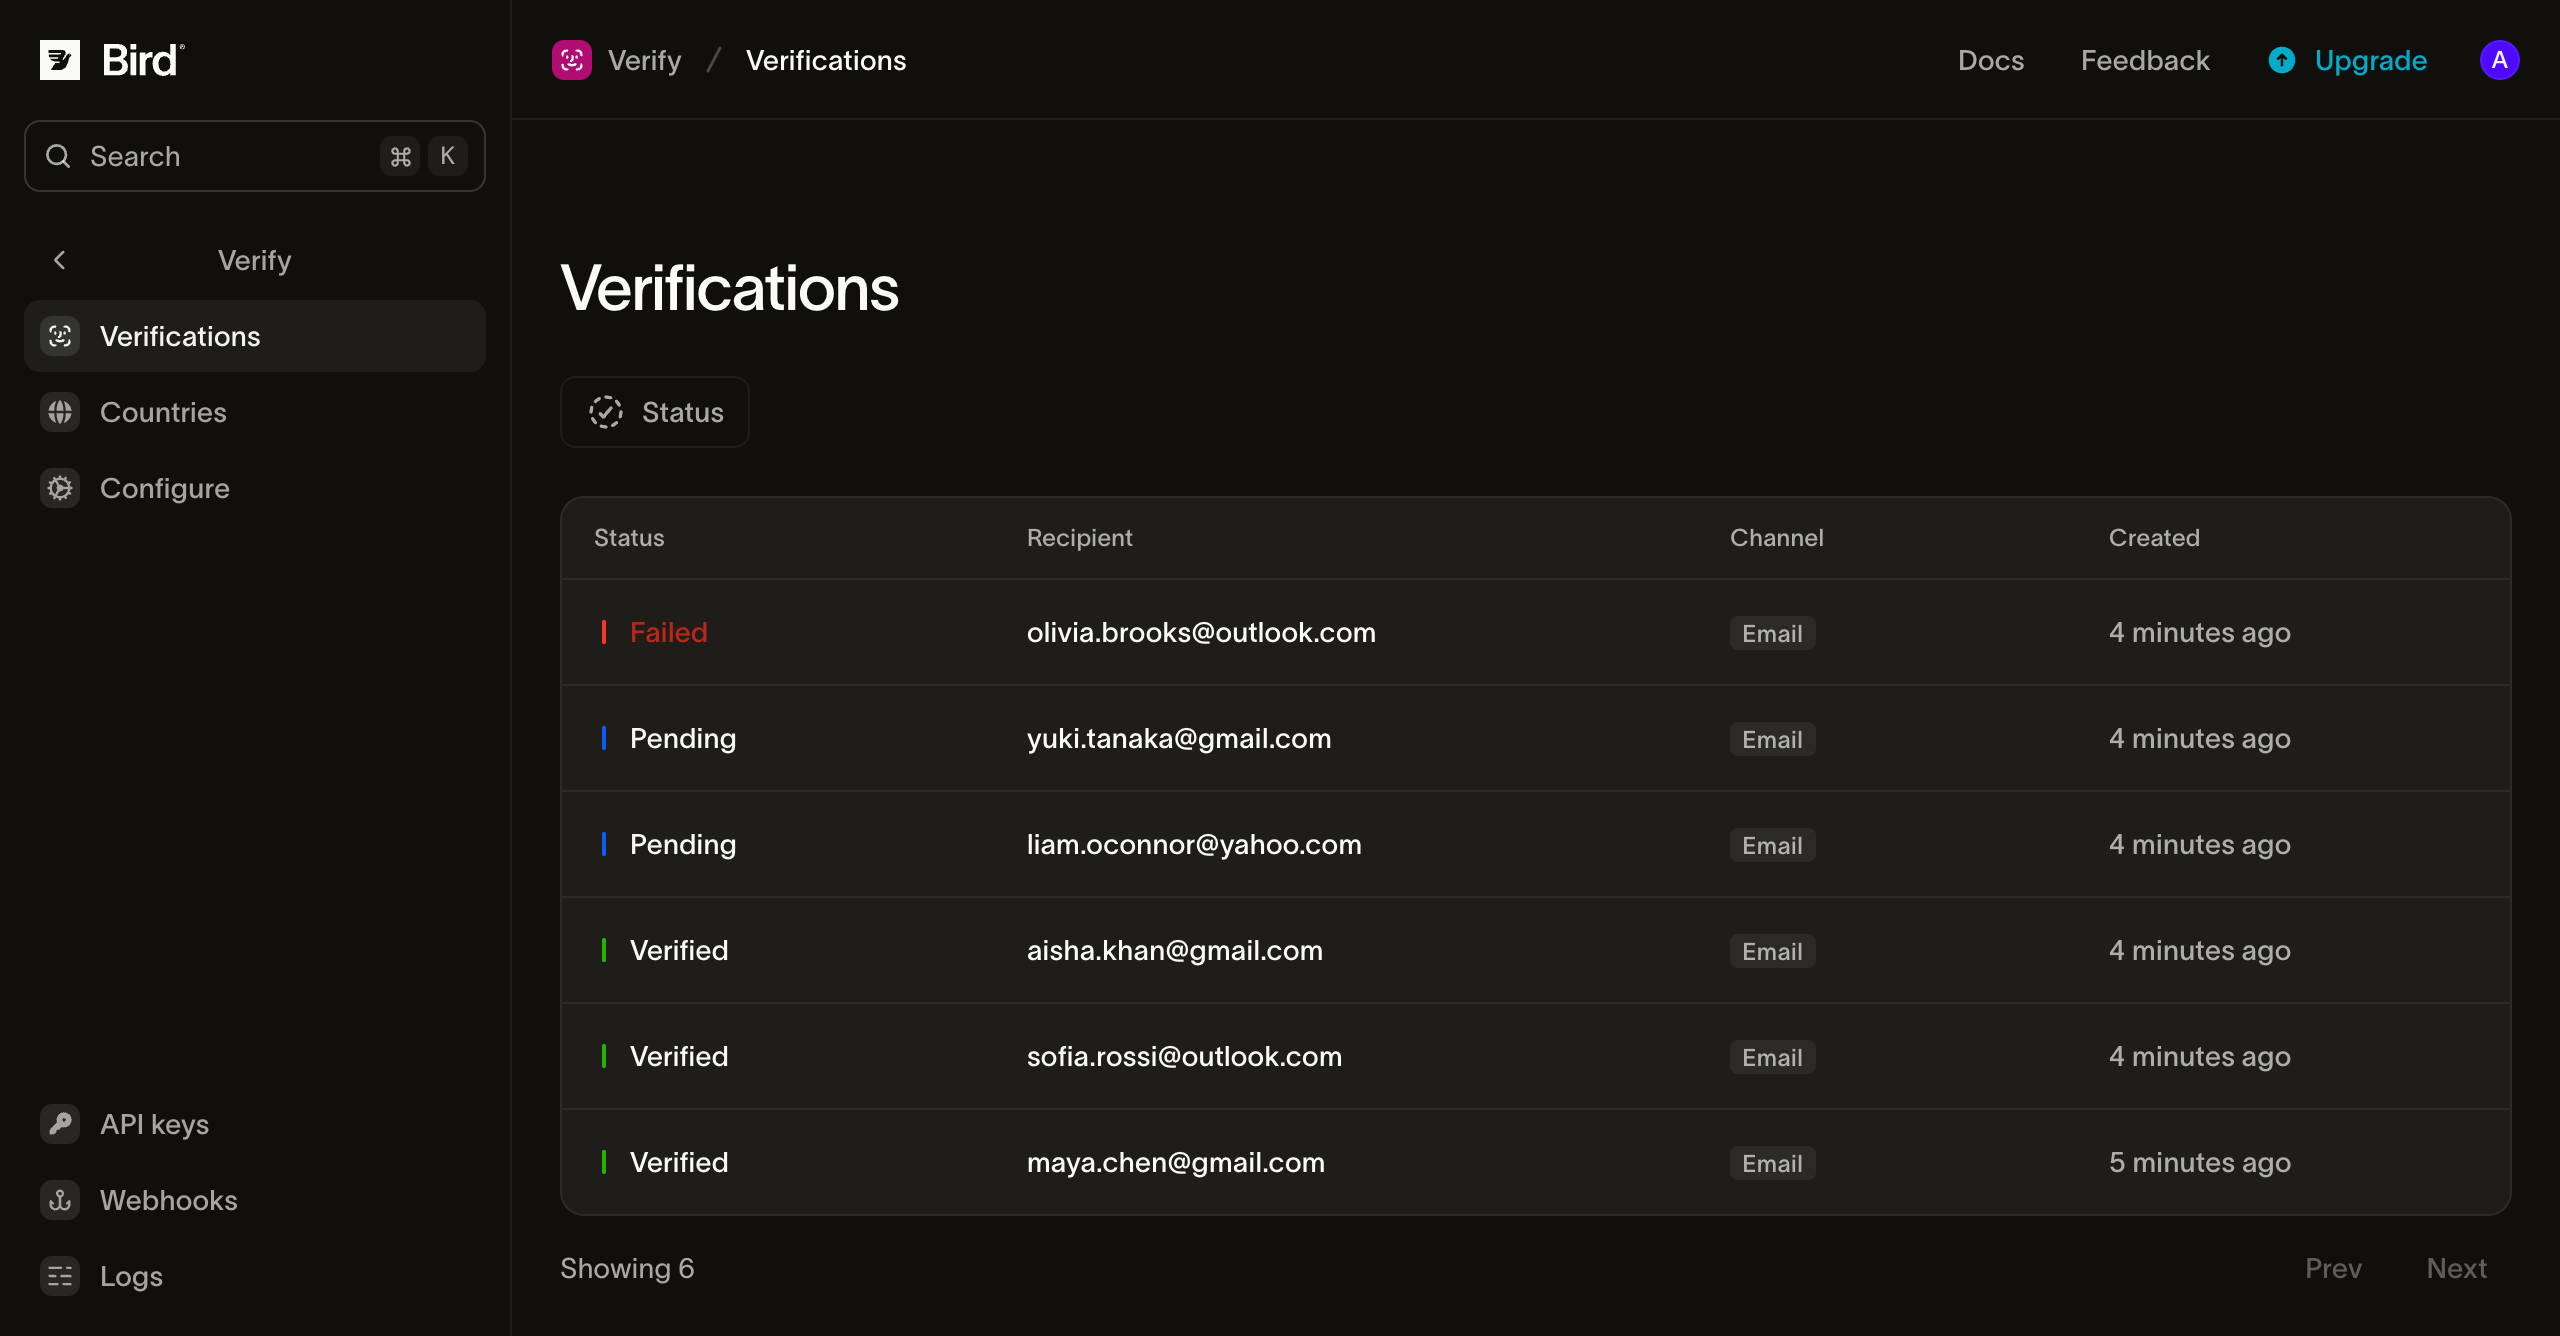
Chaque vérification que vous créez apparaît sur la page Verifications avec son statut, son destinataire, son canal et son horodatage. Le code généré n'apparaît pas.
Vérifier un numéro de téléphone à la place
Pour vérifier par SMS, indiquez un numéro de téléphone dans to au format E.164 au lieu d'une adresse e-mail :
const verification = await bird.verify.verifications.create({
  to: { phone_number: "+15551234567" },
});
console.log(verification.id, verification.status);
verification = client.verify.verifications.create(to={"phone_number": "+15551234567"})
print(verification.id, verification.status)verification, err := client.Verify.Verifications.Create(context.Background(), bird.VerifyVerificationsCreateParams{
To: bird.VerificationTo{PhoneNumber: bird.String("+15551234567")},
})
if err != nil {
log.Fatal(err)
}
fmt.Println(verification.Id, *verification.Status)$verification = $bird->verify->verifications->create(
(new VerificationCreateRequest())->setTo((new VerificationTo())->setPhoneNumber('+15551234567')),
);
echo $verification->getId(), ' ', $verification->getStatus();bird verify verifications create --body-file - <<'JSON'
{
"to": {
"phone_number": "+15551234567"
},
"metadata": {
"correlation_id": "signup-7f3a"
}
}
JSONcurl -X POST "https://{region}.platform.bird.com/v1/verify/verifications" \
-H "Authorization: Bearer $TOKEN" \
-H "Content-Type: application/json" \
-d '{
"to": {
"phone_number": "+15551234567"
},
"metadata": {
"correlation_id": "signup-7f3a"
}
}'La vérification est identique : remplacez email par le même phone_number. L'envoi par téléphone est prélevé sur le solde SMS de votre espace de travail, et le pays de destination détermine la route. Bird essaie WhatsApp en premier dans la plupart des pays et SMS en premier dans certains. Configuration par pays affiche et configure les canaux disponibles et leur ordre pour chaque destination. Expéditeurs et personnalisation montre ce qui arrive sur chaque canal.
Atteindre l'utilisateur sur les deux canaux
Vous n'avez pas à choisir un seul canal. Incluez à la fois un email et un phone_number dans to, et Bird établit un plan de livraison à partir de votre configuration par pays, qui affiche les canaux disponibles et leur ordre pour chaque destination. Bird suit ce plan jusqu'à ce qu'un envoi soit accepté. Si la livraison échoue par la suite, Bird envoie un nouveau code via le canal suivant. Vérifiez le code avec le même objet to utilisé pour créer la vérification. L'utilisateur saisit le code qui lui est parvenu.
Étapes suivantes
- Envoi de vérifications : options, statuts, renvois, paramètres et limites en détail.
- Configuration par pays : activer des pays et définir l'ordre des canaux par pays.
- Expéditeurs et personnalisation : apparence des messages de code et envoi d'e-mails depuis votre propre domaine.
- Référence API de Verify : le schéma complet des requêtes et des réponses.
- Vérifier les numéros de téléphone à l'inscription : une vidéo qui intègre le même flux dans une boutique en ligne
Ressources associées
Poursuivez avec la documentation, les guides et les exemples sur ce sujet.