Reach

Grow

Manage

Automate

Reach

Grow

Manage

Automate

如何阅读电子邮件头

电子邮件

1 min read

如何阅读电子邮件头

电子邮件

1 min read

如何阅读电子邮件头

所以你想提升你的电子邮件技能,亲自实践,并保持在争做世界最佳邮件发送者的竞争中——或者说是类似的东西。这篇文章将让你对电子邮件头有一个实用的理解,了解它们的重要性,如何访问它们以及如何阅读它们。

所以你想要解码电子邮件头信息

那么,你正在寻找提升电子邮件技能的方法,深入实践并保持竞争力,力争成为世界上最好的电子邮件发送者——或类似的目标。本文将为你提供电子邮件头的实用理解,它们的重要性,如何访问它们以及如何阅读它们。

为什么你应该继续阅读?

Email headers provide rich information to help with any number of investigations. Most importantly, email headers provide a means of verifying the origin of a message. Other cool beans things headers help with are;


  • Authentication results (SPF/DKIM). These are critical to solid deliverability!

  • Any hops the message may have taken along the way

  • Timestamps from when the message reached certain waypoints


Anyone working in the following areas should know the basics about email headers:


  • Developers

  • Marketers

  • Security/Abuse teams

  • Fellow dorm-room nerds (I thought you looked familiar!)


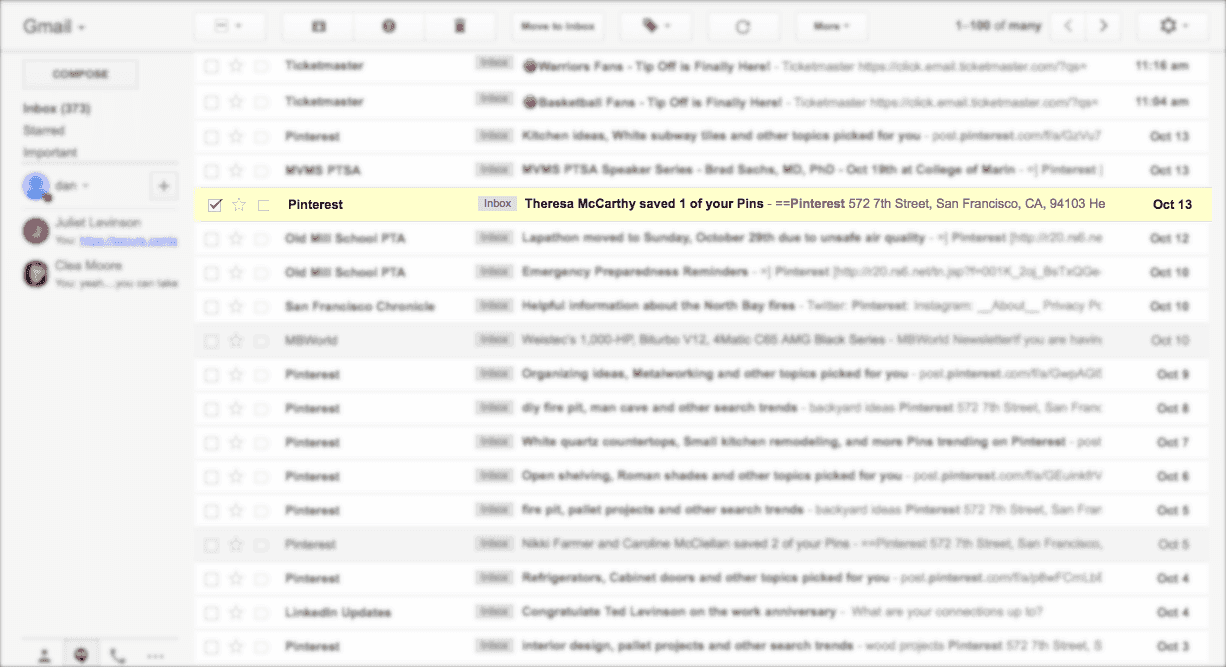
Step 1: Get to the Choppa! (e.g. head on over to your personal inbox)
Depending on which email client you use, mail headers can be presented with some variation, I’m a numbers guy, you’re a numbers guy…so, we’ll just pick Gmail. Find a message that was ‘promotional’ or ‘notification’ in nature, as this will yield the best demonstration use case. I’ve chosen the fine folks over at Pinterest. If your company already sends mail, those would be fine samples to use as well.


An email in a full inbox


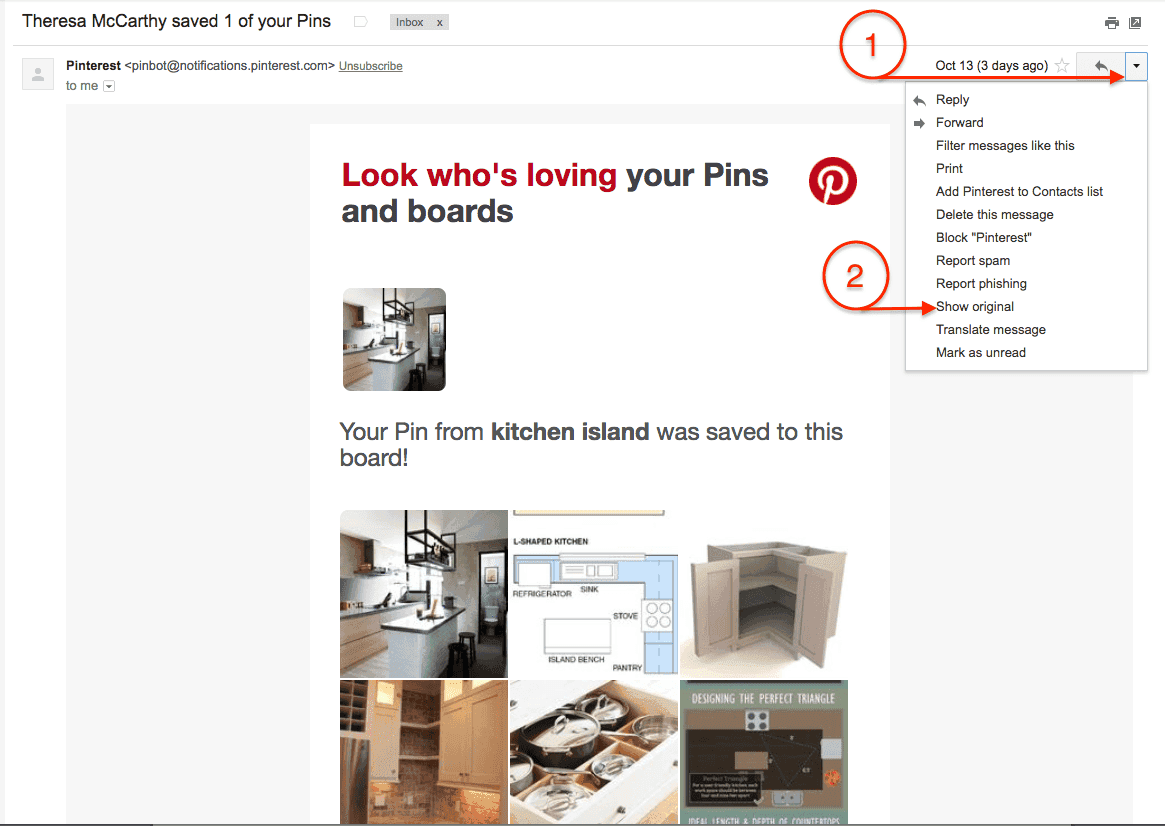
Step 2: Open the email in the reading pane
Adjacent the ‘Reply to button’ hit the down arrow (1), then ‘show original’ (2)


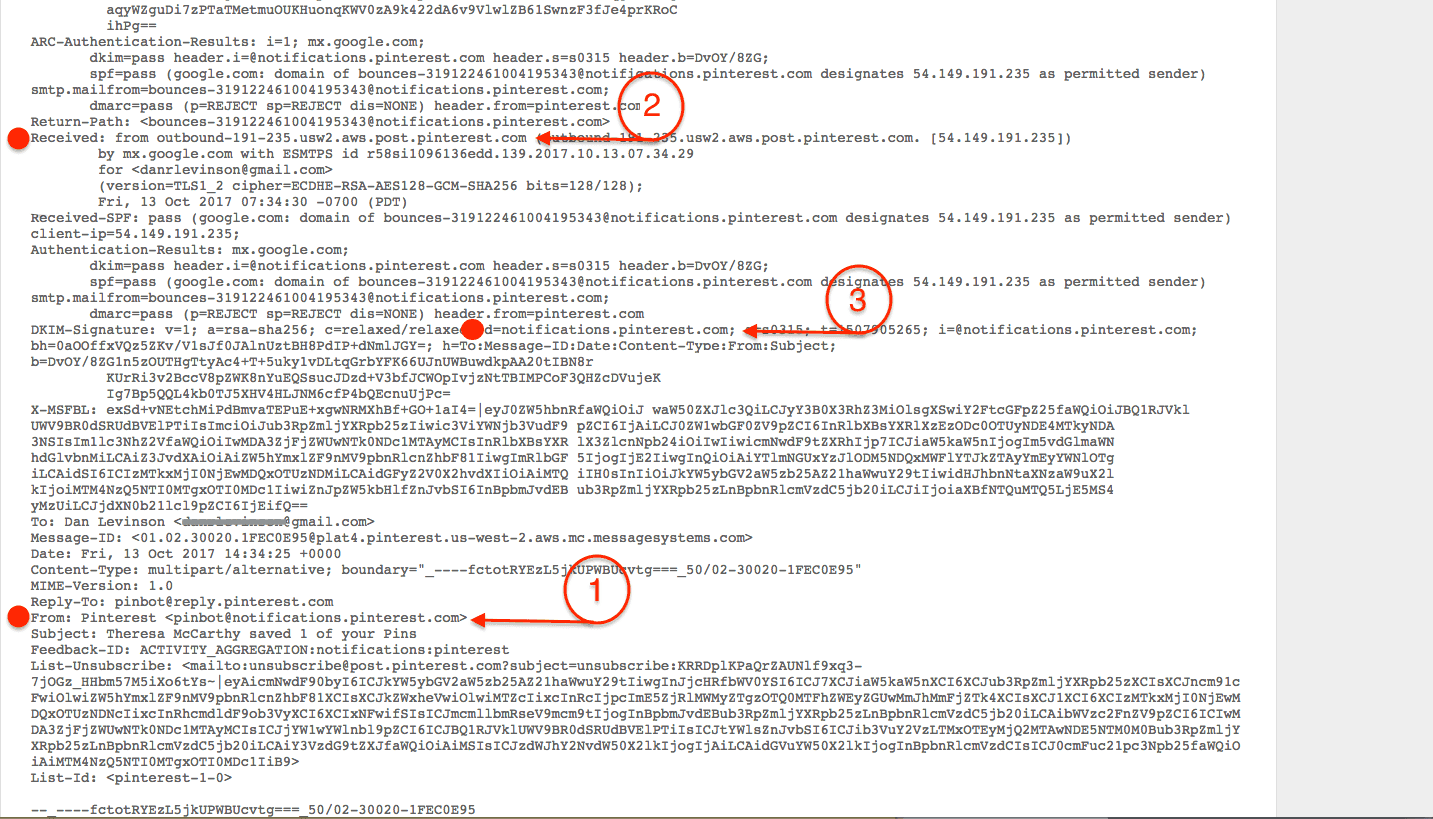
Eh voila, headers!. What you’re actually looking at here is a combination of headers and the message itself, in all of its parts (html, plain text version, to, from, subject, yada yada). For the purpose of this how-to, we’re going to avoid getting overtly technical and focus solely on the header portion. At the bottom of this post, I’ve included links some awesome extra credit reading.


Step 3: Who dis? (e.g. Finding the sender)

Let’s look for ‘who’ sent the message. This isn’t as easy to answer, as you’d think. Reason being is that some of the coolest companies on the planet actually make a living at helping other companies send their email (see what I did there? snort snort). In the spirit of keeping things basic, we’re going to show you a single-party example. You should know however that it’s not uncommon that a single message references multiple responsible parties. In the case of my example, it was transmitted using SparkPost.


Here are the three header values that carry the ‘who’ part.

  1. ‘From’: This is the entity that the recipient see’s in their email client.

  2. ‘Mail From’: This is the entity that is used for Sender Policy Framework (SPF). The SPF entity uses special DNS entries to ensure that the IP address used to transmit the message is authenticated. This header field has a few other names; Return-Path, envelope-sender and bounce domain.

  3. DKIM domain: This is the entity that has signed the message. Signing a message is an important practice to ensure that the message was not altered in transit. DKIM also uses special DNS entries to ensure authenticity.


emal headers how to


Step 4: I think he’s Five-oh (e.g. Checking Authentication results)

Now we know who sent it, let’s make sure this message was really sent by Pinterest.

  1. SPF: You want to see a string match for ‘spf=pass’

  2. DKIM: You want to see a string match for ‘dkim=pass’

  3. DMARC: (separate blog post coming on this one. Be sure to bookmark our blog and check back in)

Congrats! You now know about 1000% times more about email then your downstairs neighbor.

加入我们的Newsletter。

通过每周更新到您的收件箱,随时了解 Bird 的最新动态。

通过提交,您同意 Bird 可能会就我们的产品和服务与您联系。

您可以随时取消订阅。查看Bird的隐私声明以获取有关数据处理的详细信息。

加入我们的Newsletter。

通过每周更新到您的收件箱,随时了解 Bird 的最新动态。

通过提交,您同意 Bird 可能会就我们的产品和服务与您联系。

您可以随时取消订阅。查看Bird的隐私声明以获取有关数据处理的详细信息。

加入我们的Newsletter。

通过每周更新到您的收件箱,随时了解 Bird 的最新动态。

通过提交,您同意 Bird 可能会就我们的产品和服务与您联系。

您可以随时取消订阅。查看Bird的隐私声明以获取有关数据处理的详细信息。

Pinterest 标志
Uber 标志
Square 徽标
Adobe 标志
Meta logo
PayPal 标志

Newsletter

通过每周更新到您的收件箱,随时了解 Bird 的最新动态。

通过提交,您同意 Bird 可能会就我们的产品和服务与您联系。

您可以随时取消订阅。查看Bird的隐私声明以获取有关数据处理的详细信息。

Uber 标志
Square 徽标
Adobe 标志
Meta logo

Newsletter

通过每周更新到您的收件箱,随时了解 Bird 的最新动态。

通过提交,您同意 Bird 可能会就我们的产品和服务与您联系。

您可以随时取消订阅。查看Bird的隐私声明以获取有关数据处理的详细信息。

Uber 标志
Adobe 标志
Meta logo

Reach

Grow

Manage

Automate

资源

公司

Newsletter

通过每周更新到您的收件箱,随时了解 Bird 的最新动态。

通过提交,您同意 Bird 可能会就我们的产品和服务与您联系。

您可以随时取消订阅。查看Bird的隐私声明以获取有关数据处理的详细信息。